
‘Putting yourself in someone else’s shoes’ is a commonly used idiom. For a designer, however, it is an essential step in concept creation, research, and design. In order to guide any design process, the following vital question should be answered by designers; “Who is the target user, and how will he/she use the product?”
Whether beginning a design process or evaluating an existing design, understanding the users’ specific reactions and interactions is necessary for the design to meet users’ needs. For example, online retail applications look for convenience, speed, and security. Therefore, in order for the design to meet the retail application’s purpose, all the actions and interactions the user goes through need to meet these three requirements. This is why customer journey mapping is crucial to achieve this goal.
After understanding the demographics and psychographics of the user segment, designers need to track and understand the user experience and journey whilst interacting with the design. As well as putting a face and personality to their user, a designer must also tell and track a story from beginning to end.
What is a Journey Map?
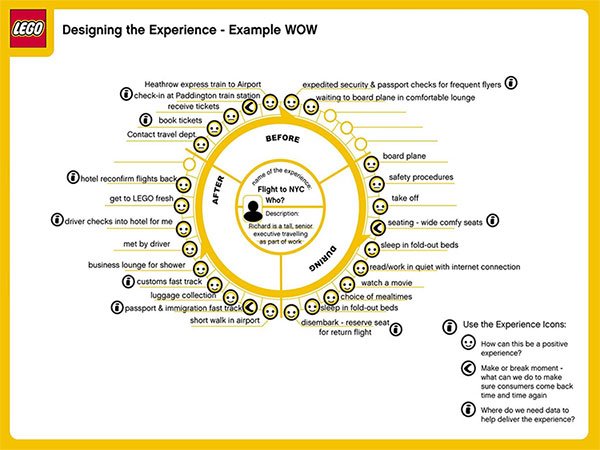
A journey map is a visual representation that illustrates how a customer engages with the design and the different touch points of the product or business. It helps visualize the consumer’s experience and keeps track of their needs, motivations, and satisfaction levels. Using a journey map not only helps identify gaps and errors within the user experience but also connects the different disciplines involved in one project.
Journey maps were first created for the service design field to help improve service organizations and have quickly become a tool used by designers and marketers for several reasons. Journey maps can be used to track the experience of online products and businesses, physical products, businesses, and spaces, and have now evolved to encompass Omni-channel products and businesses.
Steps to Create a Journey Map
While a journey map may vary in terms of objectives or which discipline it was created for, the steps below give a comprehensive overview of the important aspects of a journey map that the business as a whole can benefit from.
-
Understand the Objectives
Before creating the visual presentation of the journey, the following points should be considered to better understand the reason for creating the journey map:
- The objectives of the project; what is this project about and what are the goals of the project?
- The objective(s) of the journey map: is the map created to identify an error in the experience; solve a problem in the experience process; or track the experience of a new product?
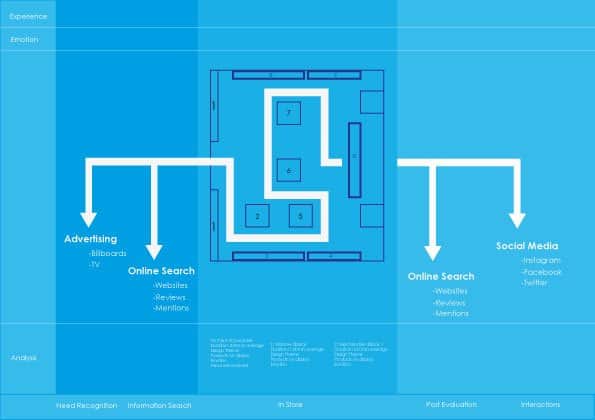
For example, in retail, designers may want to test out a new store layout and visual merchandising system, or even introduce a new line. So, navigation through the space will need to be understood and analyzed. A journey map for this particular objective will help map out and ease navigation, maximize the use of space, and improve the user experience.
-
Get to Know the Consumer
Understanding whom the user is is an essential step to creating a successful and comprehensive journey map. This entails using qualitative, quantitative, analytical, and anecdotal methods to gather and analyze information about the consumers’ needs, motivations, levels of satisfaction, and attitudes towards the product, service or business. This step also helps gather insights and suggestions from actual users and can be highly useful for the design process. While quantitative methods include conducting surveys or content analysis, qualitative methods involve interviews, focus groups, and observations. Analytical research, or website analytics, utilize analysis and evaluation of facts and figures. Anecdotal research, similar to qualitative research, helps gather insight and detailed information about the journey. The key here is to gather enough information to be able to represent the entire user segment while simultaneously gaining detailed insight from individual users within the segment.
-
Create Personas
A persona is a summary of the research gathered on the consumer and segment manifested as a fictional person. It enables the designer to create an imaginary ideal character or consumer based on all the data and information collected. A persona can be a helpful tool to prioritize and shine light on specific characteristics and observations that are important to the design. While creating a journey map, more than one persona can be created to correctly organize the research. In a retail space, one can create a persona for each of the common types of shopper the store encounters. The personas can include their reasons for being in the space, what are they buying, and when they are buying. The navigation through the space, the interaction with the sales personnel, and touch points will depend on the specific type of consumer.
-
Understand the Journey
In order to identify a complete experience, there should be a clear understanding of the actions that occur during the customer’s journey. In consumer behavior studies, a journey begins with the identification of the customer’s needs rather than his or her usage and consumption. In retail, the map tracks the consumer’s journey, beginning by identifying the consumer’s needs and ending with the consumer’s return home. Levels of a customer decision include information search, which is the method by which they will know about the store. Once the beginning and end of the journey have been identified, all the possible actions in a journey should be documented. This requires an empathetic outlook and personas created in order to create “scenarios” or actions that are likely to occur in the space.
-
Identify the Touch Points
After understanding the movements within the journey, a designer should identify the touch points involved in the process. A touch point is a point of interaction between the customer and the business. A brand’s touch points can be divided into pre-purchase, purchase, and post-purchase. Examples of touch points include packaging, advertising, product displays, and social media. In 21st century retail, touch points are becoming more versatile and diverse than ever before, with touch points available offline and online, at home and in-store. Keep in mind that touch points can consist of any interaction with the brand or business and do not need to be directly managed by the business. For example, if the product is sold through an online retailer that is not owned by the business, this channel becomes a touch point and hence a part of the journey, and should be considered in decision-making. Touch points for retail spaces now encompass everything from the store window to the store’s social media account.
-
Give Depth to the Journey
Now that the journey’s actions and touch points have been identified and organized, categorize where each touch point occurs, who is involved, and the duration. The touch points should be a representation of the brand and business, so they should all be cohesive and consistent with the overall experience. To add empathy to the map, include emotions in the characterization of each touch point. Allow time for group discussions and meetings concerning the different actions and touch points. This will allow input to be given from all relevant departments within the business.
-
Put it Together
Now that all the information has been gathered, putting the journey map together is where the information becomes visual. The layout of the journey can go beyond a traditional timeline; this is where the designer within can shine! Make sure the visual hierarchy of information is correctly mapped out and that all important information is included. Digitalizing the map can be efficient because it allows easy circulation and effortless future adjustments. In a retail journey map, the journey is designed within a layout map of the space.
Tips to Consider
While journey maps differ among departments within a business, here are some tips to consider when going through the journey mapping process:
- By creating a journey map, the designer should be able to understand the overall experience and the specific experiences within each action and touch point. If the touch points are not consistent with the brand, consider adjustment.
- Remember to identify the emotional feel that your brand expresses and design your product or space accordingly. For example, if the brand is identified as calm and relaxing, vibrant colors will alter the way the brand is perceived.
- Stay updated with how the brand and business is perceived. Consumers change regularly and understanding your consumers and how they perceive your product will give you the insight necessary to create innovative solutions.
Creating and designing a journey map should be a flexible process that puts a considerable amount of information and insight into a visual analysis. This visual analysis will ease the design and the decision-making processes. No matter the objective, journey maps are always an asset for any business and give a proactive outlook on ever-changing consumer behavior. A journey map becomes a facilitation and justification for future decision making within the business.


Leave a Reply